Nectar collectors are one of the most efficient dabbing tools for enjoying every last vapor of your concentrates. However, sticky wax can build up within your straw and create a clog, causing unnecessary waste of THC. Nobody wants that!
Honey collectors are small and come with multiple parts. These factors can make cleaning this instrument for the first time a bit challenging.
Fear not, friends. Here’s everything you need to know about cleaning a nectar collector!
Supplies Needed to Clean A Nectar Collector
Using a nectar collector is amazing. A clogged one? Not so much.
Resin can build up within your straw, making it harder to suck. These waxy residues can alter the flavor of your concentrate and create massive blockages.
With time, these dab remnants will harden. They will become even more challenging to clean. You must be proactive by cleaning your piece often.

Here’s what you’ll need to clean your honey straw effectively:
- Salt
- Isopropyl Alcohol (91% or Higher)
- Room Temperature Water
- Plastic Bags
- Q-tips
- Pipe Cleaners
- Lighter
- Paper Towels
You can also grab a pair of gloves. Concentrate residue can create a sticky black tar that can be difficult to get off of your hands.
Understanding the Parts of a Nectar Collector
A nectar collector consists of several key components that work together to provide a seamless dabbing experience. Understanding these parts and their functions is essential for effective cleaning and maintenance. Let’s explore each component in detail:
Mouthpiece
- The mouthpiece is the part you place your lips on to inhale the vapor.
- It is typically made of glass, silicone, or another heat-resistant material.
- The mouthpiece provides a comfortable and secure grip while using the nectar collector.
Body/Tube
- The body or tube is the elongated section of the nectar collector that connects the mouthpiece to the nail/tip.
- It acts as a pathway for the vapor to travel from the nail/tip to the mouthpiece.
- The body/tube may feature various designs, including straight or curved shapes, depending on the style of the nectar collector.
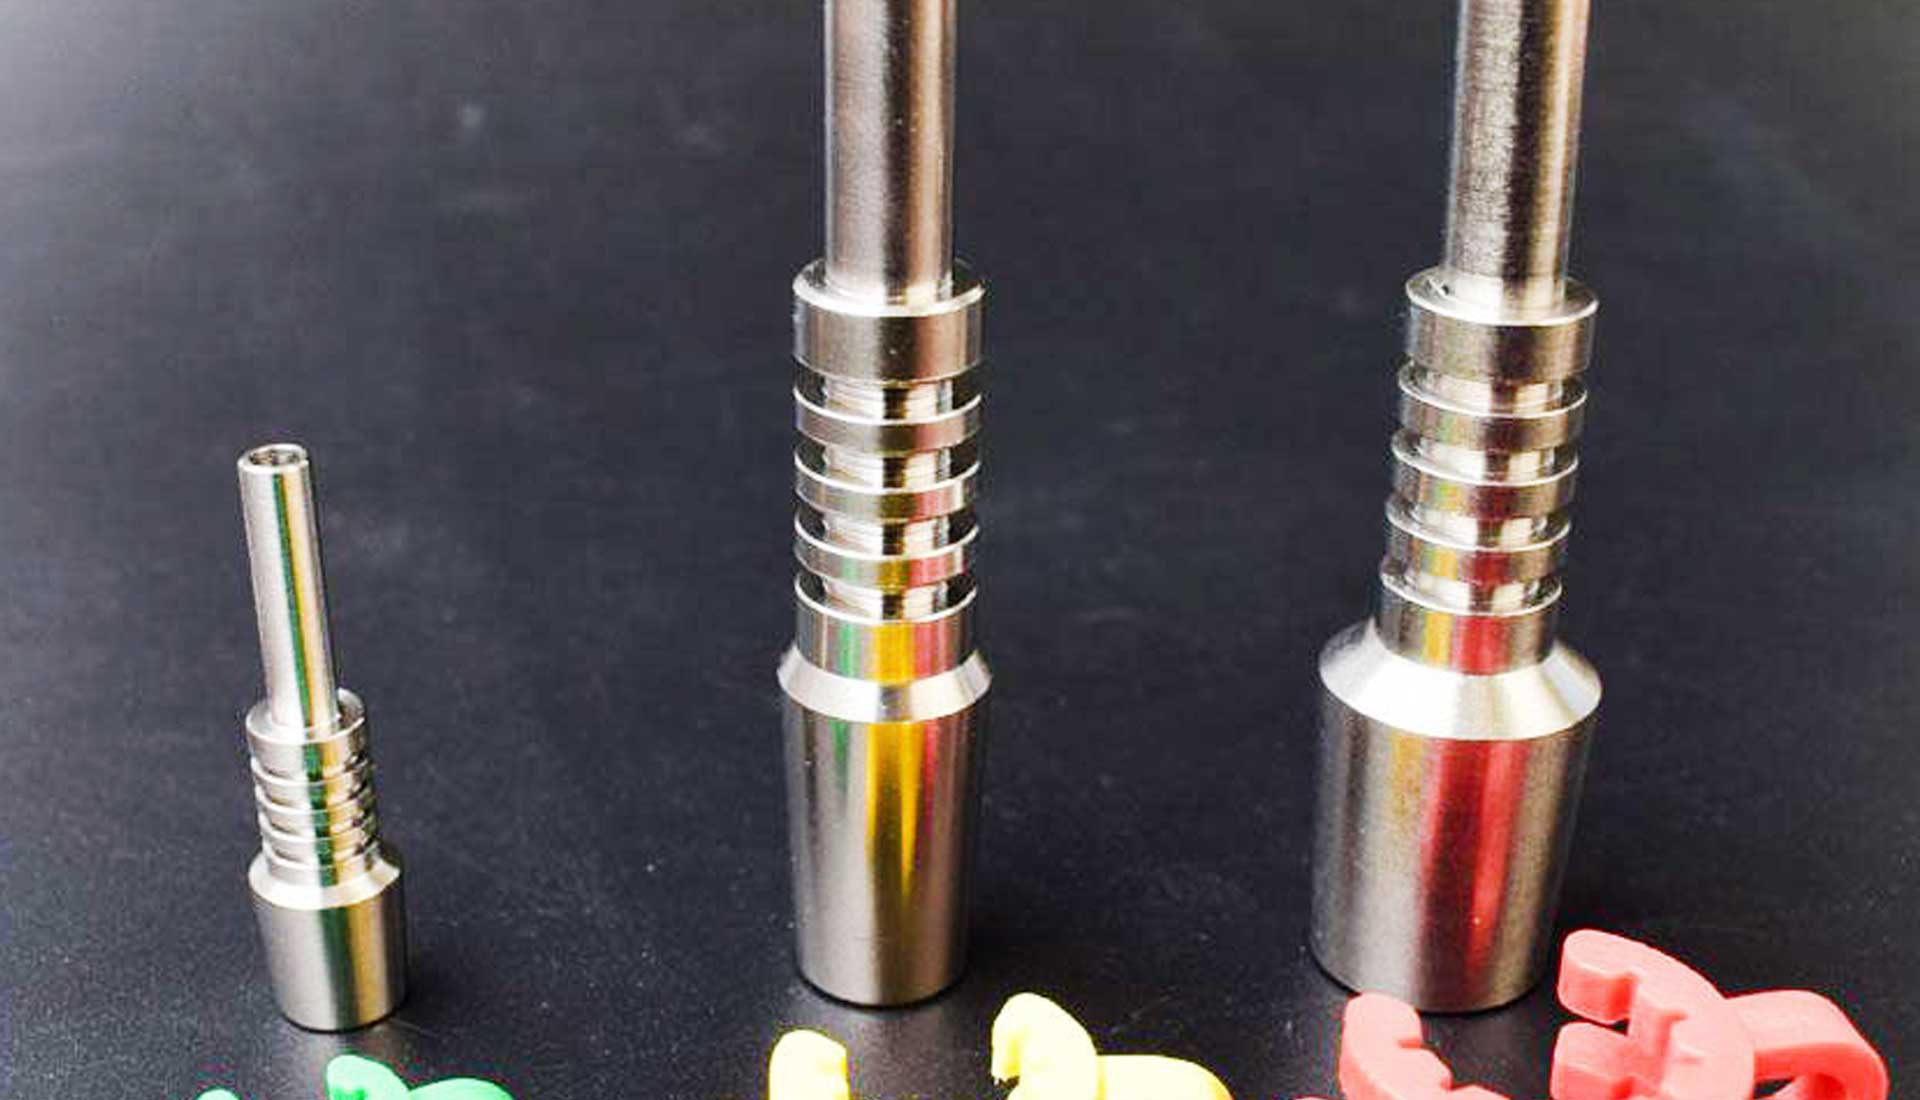
Nail/Tip
- The nail or tip is the heating element of the nectar collector, where the concentrate is applied and vaporized.
- It is typically made of quartz, titanium, ceramic, or another heat-resistant material.
- The nail/tip may have a dab dish or a perforated end to enhance vaporization and flavor.
Chamber
- The chamber is the part of the nectar collector that holds the water or percolation liquid.
- It acts as a cooling mechanism, filtering the vapor to deliver a smoother hit.
- The chamber may have various shapes and sizes, accommodating different levels of water or percolation.
Understanding the purpose and functionality of each part allows you to clean and maintain your nectar collector effectively. Proper care and cleaning of these components will ensure optimal performance, longevity, and a pleasant dabbing experience.
Cleaning Your Nectar Collector
Now that you have your cleaning supplies handy, it’s time to get to work. Here’s a step-by-step tutorial on how to clean a dab straw!
1. Take the Piece Apart
Thankfully, a nectar straw is relatively easy to dismantle.
Most honey collectors come in three pieces:
- Neck/Mouthpiece
- Water Chamber Body
- Tip/Nail
Usually, the mouthpiece is secured by a keck clip. Release the keck clip and take the mouthpiece off.
Then, slide the tip out of the bottom. Unless it’s glass or silicone, put the tip to the side. Quartz and titanium nails will require different maintenance procedures.

2. Prep Your Nectar Collector
Assess each piece to determine any potential build-ups that will require extra attention.
Pour some salt into your dab straw. The crystallines will start to break up the resin while you prep the cleaning solution.
3. Mix Alcohol and Salt
Pour your rubbing alcohol into a plastic bag. You want to use 91% isopropyl alcohol or 100-proof liquor.
These substances are highly abrasive and will help loosen the hardened residue. Plus, it can help kill any mold or bacterial growth that may have grown.
Next, add in the salt. You want the alcohol to salt ratio to be 3:1. For instance, every cup of alcohol should be accompanied by 1/3 cup of salt.
Seal the bag tightly. Shake vigorously, so the salt and alcohol integrate.
How to Clean A Nectar Collector Without Alcohol
Alcohol can leave a strong stench of vapors in its wake, which might make you not want to use it as a cleaning agent. No worries, you can still get your nectar collector clean.
Instead of alcohol and salt, opt for white vinegar and baking soda. White vinegar will cut through the muck and introduce carbon dioxide to create larger gaps. The baking soda will then fill these areas and clean them out as the salt would.
You can also boil the glass pieces in hot water to loosen up any gunk. Insert a pipe cleaner and work around the circumference to get any resin out. This method is good for slightly dirty honey collectors. Deep cleanings will need something abrasive like alcohol or vinegar.
4. Soak Your Mouthpiece and Chamber
Place the glass or silicone parts of your dab straw into your cleaning solution. Reseal the bag, once again shaking vigorously.
Try to work the solutions into the chamber. Capture as much as you can to help loosen any build-ups around your percolators or diffused downstems.
Allow the pieces to soak for at least 30-60 minutes. If you have the time, keep your pieces in the solution overnight for an even easier cleaning experience.

Tips on Keeping Reclaim While Cleaning
After this part of the process, you can start to collect your reclaim. Reclaim is an excellent gift that keeps on giving. It’s an oily build-up that accumulates in the mouthpiece. This leftover residue contains up to 60% THC.
Take your honey collector out of the bag. Pour the alcohol solution into a stovetop-friendly container.
Heat the solution at a low temperature to burn off any alcohol. Allow the reclaim to dry completely before smoking.
To collect reclaim, you will want a dab container and butane torch handy. Use the torch to heat the mouthpiece, spinning it to heat everything evenly.
You will watch the wax slowly make its way down the neck. Hover the bottom over the dab container so that hot oil can drip inside. Whatever’s left at the bottom can be smoked with the tip prior to cleaning.
5. Rinse Thoroughly
Now comes the fun part. Side note, we HIGHLY recommend a nice bong rip before moving onto this step. It will really get you in the zone.
Once you’re ready, rinse your glass under room temperature water. Like Goldilocks, you don’t want it too hot or too cold.
Extreme temps can crack the glass. Room temp is just right!
6. Q-Tip and Pipe Clean
Once the surface layer of gunk is gone, it’s time to go to town. Work a pipe cleaner in and around chamber and mouthpiece openings.

Scrape off any large plaques. Then, use the Q-tip to get into tinier crevices, like percolator holes or around the mouthpiece lip.
Get really in the pockets by pouring an alcohol-water solution into a dish. Place the chamber with the mouthpiece connected into the solution.
Inhale to create bubbles that will break up hardened soot. Don’t inhale too hard and get solution and ash water in your mouth!
Put your hands over both ends to shake things up. This step can take as long as you want.
Some people get anal and want their dab straw sparkling. Others just want to be able to use it again. Once you’re done, give the piece one last good rinsing for about two minutes.
7. Dry and Reassemble
Allow the dab straw to dry completely. You don’t want any water to drip onto your wax and hurt its potency or potential to ignite.
When everything is dry, reassemble your tip into the bottom of the water chamber. Place the neck into the top and secure the keck clip. Light the tip with a butane torch and get dabbing!
Reassembling the Nectar Collector
Properly reassembling your nectar collector is crucial for its safe and efficient use. Follow these step-by-step instructions to ensure a secure and snug fit when putting the parts back together:
Mouthpiece and Body/Tube
- Take the clean and dry mouthpiece and align it with the opening of the body/tube.
- Gently insert the mouthpiece into the body/tube, ensuring a tight connection without forcing it.
- Give it a slight twist or push to ensure a secure fit.
Nail/Tip and Chamber
- Take the clean and dry nail/tip and place it in the designated slot or joint of the chamber.
- Ensure that the nail/tip is aligned properly and sits securely in place.
- Give it a gentle twist or push to confirm a snug fit, but avoid applying excessive force that could cause damage.
Checking Connections and Alignment
- Verify that all the connections between the different parts are secure and aligned correctly.
- Check for any wobbling or looseness in the assembled nectar collector.
- If you notice any loose connections or misalignment, disassemble the nectar collector and repeat the reassembly process, ensuring a proper fit.
Additional Tips for Maintenance and Care
Proper maintenance and care are essential to keep your nectar collector in optimal condition and prolong its lifespan. Consider the following tips to ensure the longevity and performance of your device:
Cleaning Frequency
- Establish a regular cleaning routine based on your usage patterns. It is recommended to clean your nectar collector after every session or at least once a week.
- Regular cleaning prevents residue buildup, maintains the flavor quality, and keeps the device hygienic.
Storage Practices
- Store your clean and dry nectar collector in a designated case or pouch to protect it from dust, damage, and accidental breakage.
- Keep the nectar collector in a cool and dry place, away from direct sunlight and extreme temperatures.
Maintenance of Connections
- Periodically check the connections between the different parts of your nectar collector to ensure they remain secure and tight.
- If you notice any loose connections, disassemble and clean the device, then reassemble it with a snug fit.
Troubleshooting
- If you encounter stubborn residue or hard-to-reach areas during cleaning, consider using specialized cleaning tools like brushes with soft bristles or pipe cleaners with flexible tips.
- Soaking stubborn parts in isopropyl alcohol for an extended period can help dissolve buildup before scrubbing.
Avoid Harsh Cleaning Agents
- Stick to using high-percentage isopropyl alcohol (90% or higher) as a cleaning solvent.
- Avoid using harsh chemicals, abrasive cleaners, or detergents that could damage the materials or leave harmful residues.
Regular Inspections
- Regularly inspect your nectar collector for any signs of damage, such as cracks, chips, or loose parts.
- If you notice any damage, discontinue use and replace the affected component or seek professional assistance if necessary.
By incorporating these additional maintenance and care tips into your nectar collector routine, you can ensure optimal performance, extend the lifespan of your device, and continue enjoying flavorful dabbing experiences for a long time.
How to Clean A Nectar Collector Tip
If you have a glass tip, you can move on to the next step. This step is more crucial for those with titanium tips.
Boil a cup of water and 1/3 cup of salt. Immerse your nail into the solution. Allow it to sit for ten minutes before removing it from the hot water.
Use a Q-tip to clean out any residue. Cleaning this part is more important than the mouthpiece or chamber. If there’s a clog in the tip, you’re going to was
How Often Should You Clean Your Nectar Collector?
Maintaining a clean nectar collector is clutch for high-quality dabs. You should keep it relatively clean to ensure you are getting the best hits and to cut down on future cleaning time.
How often to clean a honey straw is dependent on how often you use it. Daily smokers might want to do a quick pipe cleaning once a week, with a more thorough cleaning monthly.
Moderate dabbers should clean every three months. However, nobody should wait longer than six months to clean their mini rig. It can become susceptible to mold, spore, and bacteria growth.
How do you get wax out of a nectar collector?
To get wax out of a nectar collector, you will need to first remove the titanium tip from the body of the nectar collector.
Then, use a cotton swab soaked in rubbing alcohol to gently scrub the inside of the body of the nectar collector.
This will help to break down the wax and make it easier to remove. Once the wax has been broken down, use a paper towel to wipe it out of the body of the nectar collector.
Once the wax has been removed, it is important to thoroughly clean the nectar collector. Use a cotton swab soaked in rubbing alcohol to scrub the inside and outside of the body of the nectar collector.
This will help to remove any remaining wax and residue. Once the nectar collector has been cleaned, it is important to allow it to dry completely before reassembling it.
Once the nectar collector has been reassembled, it is ready for use.
It is important to regularly clean your nectar collector to ensure that it is free of wax and residue.
Doing so will help to keep your nectar collector in good working condition and ensure that it will provide you with a great smoking experience.
![Top 5 Best Nectar Collector Kits [List & Guide]](https://cannabunga.com/wp-content/uploads/2021/05/nectar-collector-kit-featured-image.jpg)
![Top 8 Best Glass Nectar Collectors [List & Guide]](https://cannabunga.com/wp-content/uploads/2022/12/nisonco-pr-and-seo-OhyGBX03ccg-unsplash-360x240.jpg)